The Big Picture
A simple workshop for getting shared understanding in a complex space
Donal Spring
John Mark Ishikawa
What Is The Big Picture?
An Open Tech practice that costs little to produce but is great in creating a shared understanding of part of a system is the Big Picture Workshop. It is a simple practice used to visualise all the steps that a software pipeline goes through in moving code from source (eg git), through compile and test then into the hands of our Happy Users. Building it collaboratively is a great activity for a team to do as it helps to bridge the gap between the techies and the business folks. It’s great for articulating the importance and sometimes the complexity of continuous delivery. A Big Picture can easily be created with just some Stickies and a clear board or space. Of course - if you’re feeling more artistic it can also be doodled!
Why Do The Big Picture?
You’re probably reading this and thinking ‘Sounds fluffy to me - why should I bother to make one?’
- Shared Understanding - ahhh the golden dream of Shared Understanding! When the whole team collaborates around making the Big Picture they get a shared sense of how their pipelines connect code to end users.
- Prototype Quickly - It’s cheaper to write and draw before implementing a single line of code! Rapidly prototype with some sharpies and postits, moving stages of your pen and paper pipeline without opening your laptop.
- Complexity Simplified - Big Picture helps bring the non techies into the mix by showing them the components required to manage the softwares lifecycle. Build it up one step at a time to demonstrate the complexity in a simple visual flow.
- Information Radiator - Like all these practices, the Big Picture is an evolving artifact. As the complexity of a software delivery pipeline grows, the Big Picture should be updated to reflect this. It is a graphic which can be displayed to all and should not be hidden.
How to do The Big Picture?
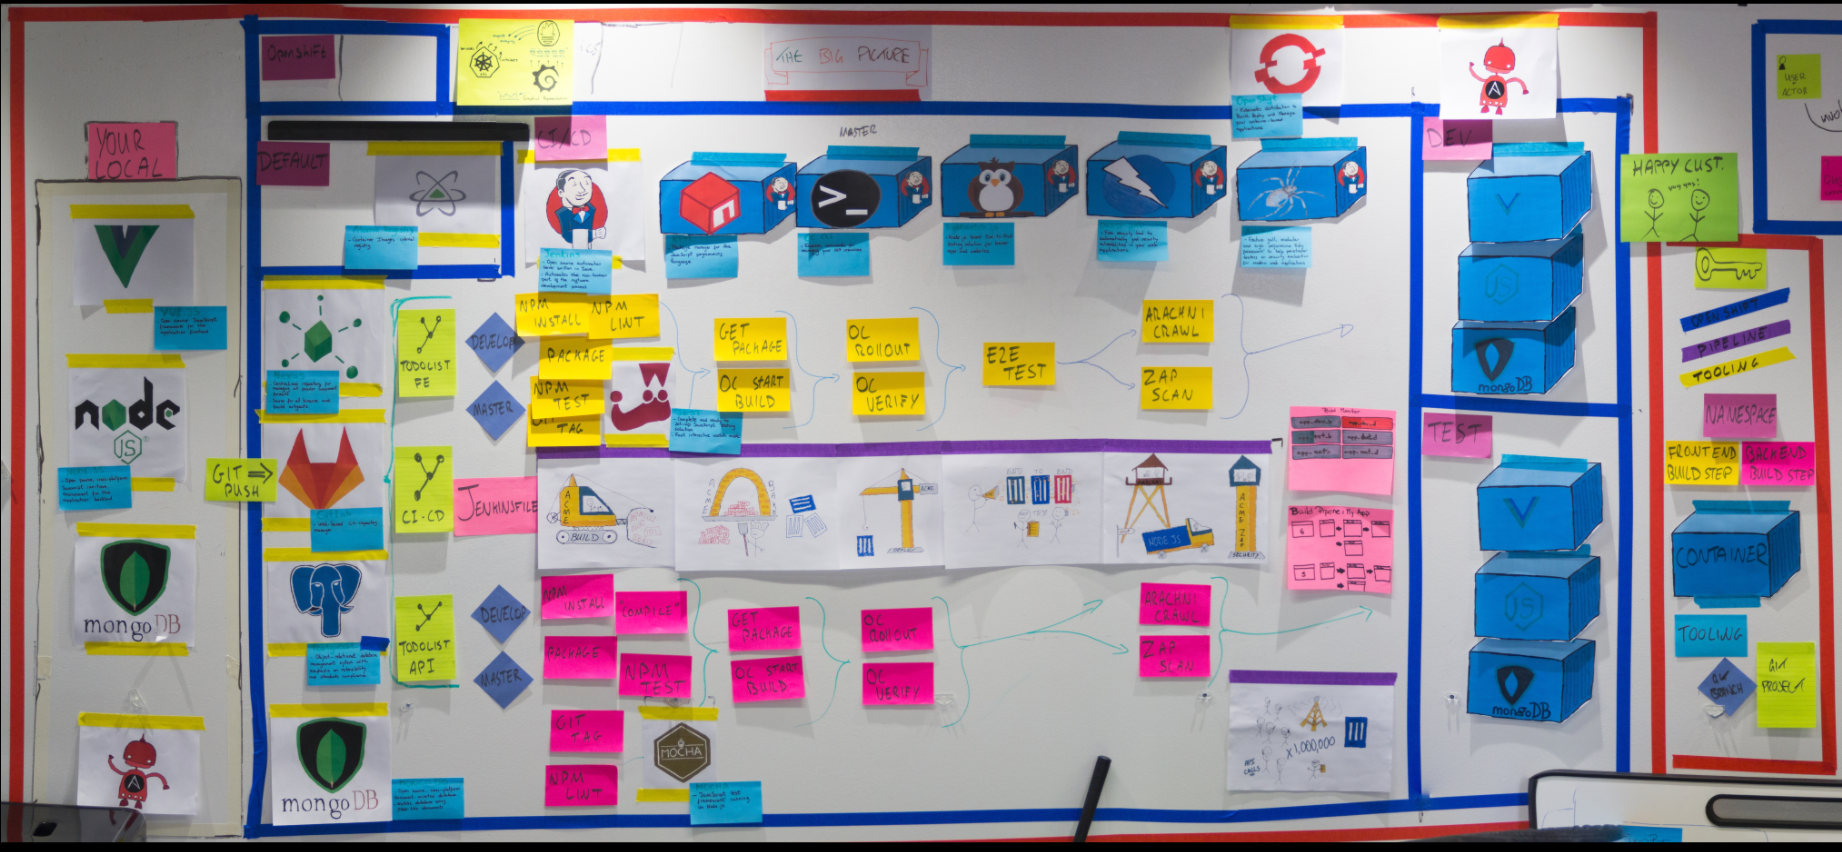
Get some Stickies and painters tape and a lot of space! Draw up your servers or playforms in tape to frame the big picture. For example, a big red box could represent an OpenShift Cluster.
With this in place, carve out the box into segments to represent each project or namespace within your cluster. These could represent your CI/CD namespace, dev and test environments. Label them and create a key, again using a few stickies! It's much easier to scaffold things out using stickies than writing a sinlge line of code :)
Next step is to add our Local Environment, if that's your laptop draw it outside the cluster, if not include it inside! Fill your local environment with the local dev tools required by the team. For example perhaps the team needs Ansible or NodeJS installed or even both! Draw a doodle of them and pop them in the Big Picture.
With the labels and projects in place, add in your CI/CD tooling to the namespace. Draw up Jenkins or Tekton or whatever else you're using and write a one line description of each to help new team members when onboarding them.
With all the compenents in place, create your pipeline. Draw the stages and add the lower level details ie the steps. This lower level detail is probable more helpful for the techie team, but it provides a great oportunity for the team to share this detail with the designers, product owners and anyone else who is interested! Add these pieces to the key and tell the story of code moving from source through builds and into an environment!
Look at The Big Picture
Links we love
Check out these great links which can help you dive a little deeper into running the The Big Picture practice with your team, customers or stakeholders.