Service Blueprint
A business process diagram analyzed from the people perspective.
Darcie Fitzpatrick
Jordi Olive Calderon
What Is Service Blueprint?
“In 1982, the term “Service Design” was coined by Lynn Shostack. She proposed that a business should develop a “service blueprint” which details the processes within a company and how each process interacts with other processes.”
Lynn Shostack later wrote an article for the Harvard Business Review which evangelized service design methodology and the service blueprint.
For the purposes of digital product and software practices, the Service Blueprint is an applied process chart which holistically dissects a particular operational workflow, product offering, business structure, or the like. The blueprint is always mapped from a people perspective providing empathy and shared understanding of the user, business, technical, and support actions for process steps, all in one easy to digest chart.
The typical service blueprint for a technical project will identify:
- Phases: A Service Blueprint is read from left to right, unfolding over time. Define the phases of how a user interacts with a service
- Physical Evidence: Tangible items associated with each step of the process
- People Actions: User steps that people take as part of the process
- Line of Interaction: Separates people actions from technical actions
- Front-stage Actions: The technical interface or tools people interact with in each step
- Line of Visibility: Separates front-stage and back-stage actions
- Back-stage Actions: Non-visible technical requirements needed for each step
- Line of Internal Interaction: Separates technical actions from external support efforts
- Support Channels: Activities or tools required for the process to be delivered
- Flow Lines: Arrows are a key element of service blueprinting. They Indicate relationships and dependencies. An arrow could represent one-way exchange " --> "or a need for agreement and codependency " <--> " between the deferent parts of the blueprint. Missing elements and information as gaps are revealed in this process.
Secondary elements such as these can be added as needed:
-
Policy/Rules: Any policies, regulations and laws that affect on how a process is completed. This information helps to understand what can and cannot be changed as you optimize.
-
Emotional Journey: The emotional status of the user during the different stages of the experience.
-
Time: The estimated duration for each phase of the journey .Also, you can represent the time duration for each of the actors.
-
Capture Insights:
- Pain Points
- Follow-up Questions
- Critical Moments
- Opportunities
The example below is a simple overview for the end result of a Service Blueprint. The chart typically begins as a whiteboard sketch and will iterate toward a more refined design. If it suites the project team a digital template could also be completed for this activity.
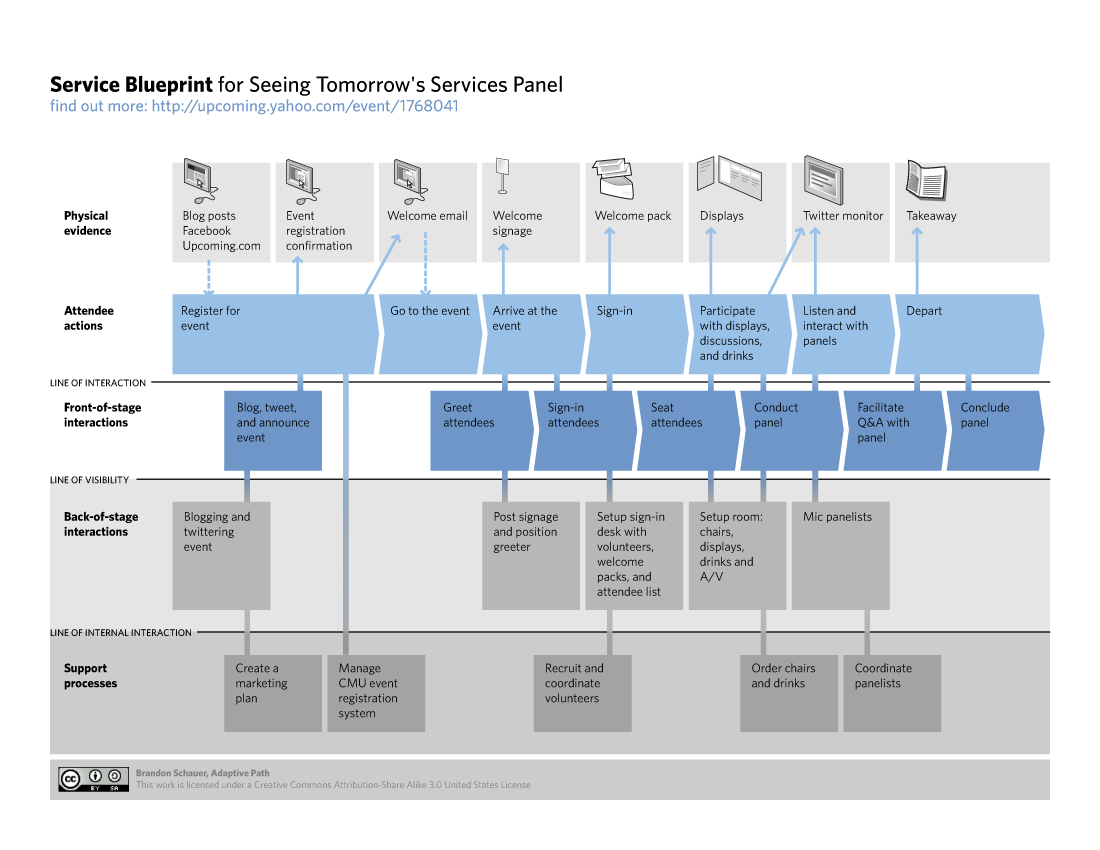
NOTE: Multiple users are usually added to the People actions because more than one user is often needed to complete a process step. A couple users make for a simple blueprint in a quick amount of activity time, while an increased number of users make for a more complex blueprint which will take longer to create.
Why Do Service Blueprint?
The Service Blueprint can be used to map the actual experience of a service (As is), the quick wins & evolution to be implemented short/middle term (To be) and the long term strategy of evolution of the service (Ideal).
It can help you to:
- Identify process problem areas and growth opportunities
- Find a new or existing product offering
- Recognise the business structure of a startup or established company
- Align end to end perspectives on a service experience
- Understand all the moving parts of a service
- Align the team around a common understanding
- Visually share knowledge with others
- Ensure that the pieces of an experience will fit together
- Envision customer flow and architecture of the service experience
- Visualise an abstract concepts and make them tangible
The blueprint will quickly point out assumptions and unknowns about a process across all business units, plus discover any confusion or misinterpretations within the process steps. This information can drive exploratory and validation research with users along with necessary technical and business research, to later define opportunities, strategy and solutions.
How to do Service Blueprint?
It is important to have primary users identified prior to starting the blueprint but some exploration of secondary or tertiary persona groups will be done with the activity. Focus on one (1) main process per service blueprint, prioritized by the top user/business problems to be solved. Follow these steps to initiate and develop blueprint:
Step #1: Book a work area with a large whiteboard or flat wall surface to create the blueprint. It is ideal if the chart can remain in this area for the length of the project because it is often referenced with later activities.
Step #2: Before the activity starts create a large physical template for the Service Blueprint chart. If a whiteboard is used make a grid with painters tape to mark off areas for Physical Evidence, People, a Line of Interaction, Front-stage, a Line of Visibility, Back-stage, a Line of Internal Interaction, and Support Channels. Be sure to leave extra space in the height of the action sections (especially People) for adding multiple rows. If a flat wall surface is available butcher paper and sticky notes will also work well.
Step #3: Gather project team to the area and walk through an overview of the Service Blueprint template and why it will be helpful in reaching goals. Talk through the how-to instructions and ensure the team is aligned on guidelines. Also, see Tip #2 below for an easy way to introduce the blueprint concept.
Step #4: As a team review and align on the business process that will be dissected for this service blueprint activity. Discuss the People who are involved with this process so there is consensus on the actions being considered. The chart is flexible and can unfold a simple or complex process depending on needs of the project.
Step #5: Facilitate the first step in the process by identifying each section of the blueprint as a vertical slice, ensure the team focuses on just one step at a time. With Front-stage consider tools such as email, interfaces or internal/external tools needed, etc., to complete the step.
- Often new users or front/back-stage requirements come up further along in the process chart so leave room for adding new rows.
- For Physical Evidence consider hardware and devices, or anything tangible and draw a small picture of these items in the row.
- For People make sure to first focus upon primary users of the action, then add each user in a new row, to complete the step. The action steps can be drawn like a user flow diagram.
- With Back-stage consider what makes the Front-stage feasible. Consider which databases or servers are required, etc. These sections are usually drawn like an information architecture diagram.
- With Support Channels think of help systems, chat, or third-parties that help deliver that step.
Step #6: Take turns facilitating steps of the process chart and try to give everyone on the team a chance to work through at least one step. Or if the group is less inclined to collaborate feel free to use one facilitator for the entire blueprint.
Some facilitator tips that are good to consider include:
Tip #1: Use different widths or colors of painters tape to separate the sections for Actions from Lines. Sometimes the blueprint length extends longer than anticipated (depending on number of process steps) so keep tape or butcher paper handy if that happens.
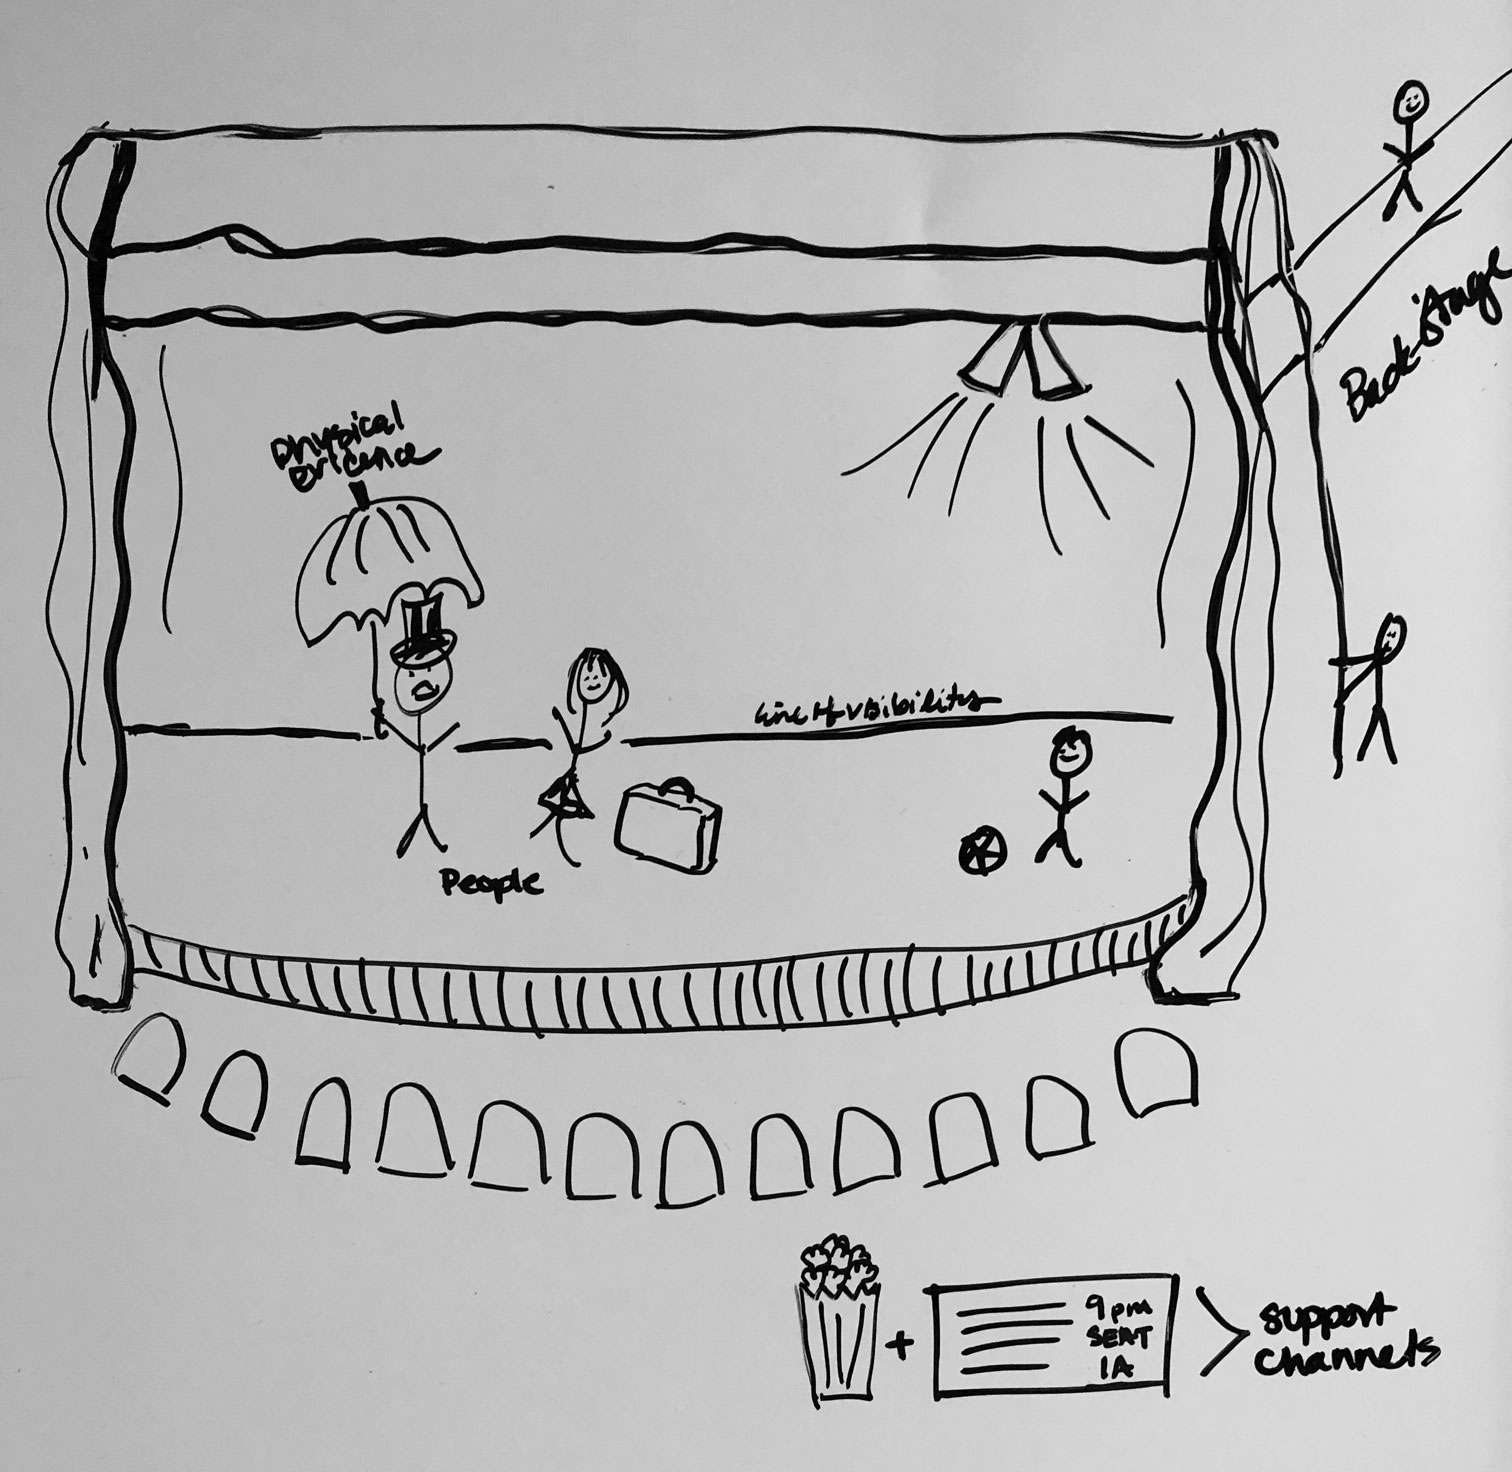
Tip #2: Introducing the Service Blueprint can be a complex concept to adapt. Using a simple metaphor is a good way to overview the activity for a project team. As with some other user related tasks, the analogy of Live Theater works quite well. The story is usually shared via improv but goes something like this:
On stage facing the audience (is the Front-stage) then there are actors (the People) who use props (their Physical Evidence) to act out scenes (the Steps) in a play (our Process). Behind the curtains (which is the Line of Visibility) many tasks produce the play (which is the Back-stage). Also there are partners who keep the theater operating (the Support Channels).
This is nicely explained while doing a quick whiteboard sketch to talk through the analogy and referencing the blueprint template.
Tip #3: When the service blueprint activity begins, make sure to talk through each vertical step of the process chart out loud prior to documenting. This will ensure alignment and shared decision making.
Tip #4: Be visual and use drawings whenever possible to represent the information shared, this will create an easy to reference chart (e.g. draw a cell phone when referring to this as physical evidence or draw a database symbol to reference this in back-stage actions). Also, use multiple colored pens to highlight certain areas of interest with each step, either with notes, boxes, dashed lines, etc.. For example, Red can quickly identify unknowns or problems and maybe Blue can identify opportunities, etc.. Draw a ‘key’ in one corner of the blueprint for viewers to understand symbols and color coding.
Tip #5: If the blueprint sketch can not stay in the scheduled work area, digitize it and print it as a large poster this will go a long way as point of reference and makes a nice centerpiece for project presentations. Also, be sure to capture pictures through the activity, including panoramic shots! A time-lapse might be nice too.
Tip #6: Reference the blueprint after conducting research and update it based upon findings. It will be easier to do so if the blueprint is digitized after the initial activity.
Outcomes
A user-centered chart with holistic views across all business units required to deliver the process being reviewed. This includes a detailed contextual understanding of process unknowns, problems and opportunities, plus empathy for the people responsible for each step. This information can be used for research efforts and strategy development.
Service blueprinting is a fun, collaborative activity that can truly drive direction for many projects, plus the chart deliverable resonates well with stakeholders.
‘Process’ Examples
- Enterprise B2B Application: Employee Workflow Process
- Software as a Service: User Journey Process
- Service Organization: Customer Experience Process
- Startup Company: Entire Business Process
Previous Steps
It is recommended to check some steps before start mapping to ensure we have the necessary information, user research and appropriate decisions taken:
- Create your goal statement (Return to that statement as you build your map)
- Define your target audience and needs
- Choose the experience to map first
- Select channels to map (in store, print, web, mobile)
- Identify Stakeholders
- Create the user story
These are some examples of highly recommended practices that will help you to get ready to build a Service Blueprint:
- Journey Map
- Empathy Map
- Proto-Persona
- Impact Map
Facilitation Notes
Prerequisite Knowledge: It is best if an understanding of the people ecosystem and primary users is known ahead of this activity. A priority of top user and business problems to solve should also be established. Spend time before starting the blueprint to determine one (1) main process to focus upon which aligns with the primary users and prioritized problems.
Deliverable: The level of final chart fidelity should be determined by project requirements and goals, this blueprint can be reviewed as a photograph, digitized and shared virtually, or printed as a poster and displayed.
Experimentation: It is encouraged to experiment with the type of process reviewed. This activity works well for all industries and business categories.
Supply list for whiteboard:
- Painters Tape (1” for Action rows, ¼” for Lines rows)
- Dry Erase pens (multiple colours)
- Camera(s) for documenting
- Sticky notes & Sharpies for good measure
Supply list for wall space:
- Butcher Paper (white is best - might need two rows of paper)
- Markers (multiple colours)
- or Sticky notes (multiple colours) & Sharpies
- Camera(s) for documenting
Look at Service Blueprint

Links we love
Check out these great links which can help you dive a little deeper into running the Service Blueprint practice with your team, customers or stakeholders.